Showing posts with label glam up. Show all posts

Friday, January 3, 2014

Makeup: Conceal, Be Bold and Set it! (Sephora)


Dear lovely readers,
Thank you all so much for an awesome 2013! It's been about half a year since I started blogging and I feel so happy to receive so much love and support from all of you out there. One of my resolutions is to blog more interesting things and get involved in more events! So, fingers crossed that all goes well this year. I wish best of luck to all of my readers and have an awesome 2014! Bonne chance!

 ~.~.~.~.~.~.~.~.~.~.~.~.~.~.~.~.~.~.~.~.~.~.~.~.~.~.~.~.~.~.~.~.~.~


I've been wandering around in malls since my semester break started as I was looking for some stuff and also to do some random shopping. The boyfie made a sweet promise to get me one of Urban Decay's Naked palettes after I excitedly told him I wanted to go and see Naked 3's palette (btw, I did not expect nor have the intention for him to get one, that's why it was a really sweet deal). So, we went to Sephora in Sunway Pyramid the first day and they said that it's out of stock in all branches :(

Oh well.. Tough luck to get one for now but as it's not mandatory for me to have one, it's okay. Then I remember that I wanted to try and get a red lipstick. Initially I wanted to get a lipstain as I've read and seen a lot of reviews that it's hard work to apply and maintain a red lipstick. But there weren't a lot of options for the lip stain, so I went around Sephora looking for my red lipstick. After more than half an hour, I finally found one which is both affordable and up to my requirements (awesome color and texture).


Clinique's High Impact Lip Colour
(Color chosen: No.12 Red-y to Wear)
Price : RM 68 


My opinions:
Love the texture and color
 Long lasting wear
 Easy to apply on
 SUPER in LOVE with the color!
 Matte application but subtle glossy finish
 Love the packaging; simple and glamorously chic
HIGHLY RECOMMENDED


The end product 

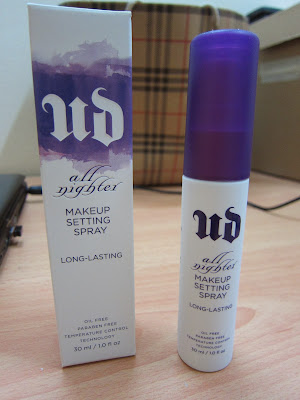
While queuing to pay, I saw this makeup setting spray at the mini counters near the cashier lane. I remember seeing some makeup gurus using such sprays on Youtube, so bought one to try since I don't like the hassle of touching up my makeup and bringing a whole bag of makeup with me when I'm out. 


Urban Decay's All Nighter Makeup Setting Spray
(travel size)
RM49


"Is makeup meltdown ruining your midnight mojo? Mist on this weightless spray to give your makeup serious staying power. Developed in an exclusive partnership with SKINDINÄVIA, this groundbreaking, clinically tested formula is suitable for all skin types and features patented Temperature Control Technology. It actually lowers the temperature of your makeup to keep foundation, eyeshadow, blush, and concealer in place—even in hot and humid or cold and windy conditions. The result? Smoother-looking skin and vibrant makeup that lasts all day (or night) without melting, cracking, fading, or settling into fine lines." 

My opinions: 
Light weight, you don't feel it once you spray it on
 Works as stated, really holds your makeup
(NO laughing lines even after you laughed like mad for an hour)
 Love the design and feel of the packaging

Disadvantages:
- The spray is very strong, I prefer it better if it's fine as normal mist sprays


Last but not least, my 3rd finding in Sephora would be this concealer. I found this on another day when I visited Paradigm's Sephora.

Tarte's Amazonian's Clay Waterproof Concealer
(Color chosen: Light)
RM 90


My opinions: 
 Color is very natural, blends well with my skin
 Light texture but buildable, so it won't appear cakey
 Easily blendable
 Since it's all natural, suitable for sensitive skin
 Animal cruelty free!
HIGHLY RECOMMENDED


End of my purchase, they offered me their Sephora White Card. There's no annual registration fee or whatsoever, several other benefits offered and you can collect points, why not?


It's definitely a good buy I must say. Hope you all enjoy reading this review.
Happy New Year! ;)


Much loves, xoxo.


Disclaimer: The above post is all based on my personal honest opinions without getting paid by any source. Hope you enjoy this product review (:

Sunday, December 8, 2013

Makeup: Bobbi Brown's Bellini Lip & Eye Palette


My first ever Bobbi Brown makeup product. Previously I had a friend who complaint about BB's gel eyeliner, apparently it's not nice to use. That made me hesitate a little before deciding to get this palette.


Photo credits to Bobbi Brown's official website


In the end I decided to get this palette due to the reasons:
 The colors are so lovely
 It's handy for all occasions
  I love natural colored makeup
 I have all I need to quickly glam up my look


Unboxing my BB!


Lovely aren't they?


I love the fact that they gave the mini BB's eyeshadow and lip brushes, #cutenessoverload!


All of the colors are very soft and neutral which is great for natural makeup look but you can always glam it up with their shimmer/metalic colors such as Candlelight Gold (metallic), Petal (shimmer wash), Prosecco (metallic), Bellini (shimmer wash), Bronze Stone (shimmer wash), and Brown Sugar (metallic).

When looking for eyeshadows, I am always biased towards those that can last long and has the minimum fallout/smudges as I don't really like doing touch-ups (I'm a lazy perfectionist). And this palette really really really gives me that satisfaction. All evening, I only have to rub off a little smudge at the bottom lid ONCE! This is an achievement compared to the other brands that I used before which I had to clean my bottom lid frequently to avoid looking like a panda. And it comes with a big mirror! No more squeezing my face to the car's mirror if I need a quick fix.

The lip colors are very pretty, yet very sheer. They give just a hint of colour but a gorgeous glossy finish. If you prefer a rather strong look, you can always add it on after the lipstick.

Before makeup
With the makeup


Please do ignore my hair as I was letting it air dry rather than blow drying it, hence the messiness.

As you can see, the colors are really really neutral but I love the overall look. The Caviar Eyeshadow acts as an awesome liner that I can skip using an eyeliner.


Completed look for le date night except the hair 


And to add on to this look, I've used Maybelline's Angel Fit powder blusher (:


The texture is very soft and blendable, while the brush provided has a curve to it which made its application easier. Some people would apply a very heavy blush color which makes them look like Barbie instead of having the cute natural blush. With this, it can be achieved effortlessly.


Overall, I'm very satisfied with both products 
RECOMMENDED for all natural makeup look lovers.


~.~.~.~.~.~.~.~.~.~.~.~.~.~.~.~.~.~


I'll be posting where we went for our date night soon.

Till then, 
Much loves, xoxo.


Disclaimer: The above post is all based on my personal honest opinions without getting paid by any source. Hope you enjoy this product review (:

Monday, December 2, 2013

Fashion: 14 ways to style skater skirts

Fashion comes and goes but some are opt to stay for a bit
such as

SKATER SKIRTS!


There are so many types of skater skirts in the market these days..
Ranging from bold colors to prints, floral to faux leather, lace to many many more!
Almost every girl has at least one, it's like the new LBD.


More skater skirts!


What do I love about skater skirts?
 They are versatile.
 They can go with ANYTHING and EVERYTHING.
 Dress up, dress down? Up to your mood.
 It accentuates your waist without the need to show the bloated tummy like bodycon skirts.
 Cute? Glam? Girly? Depends on your pairing


What I don't like?
1. When there's wind...
2. Easily upskirt while using the stairs


Other than those 2 reasons, I don't see why not to have one!
I bought two from an online boutique named Ultraviolet since they were having a '2 for RM50' promotion
and the feedback from her customers were good. I must say, very friendly and good service by the owner. 
I enjoyed my purchase and the items' quality are as promised.
Bought a black and a nude (:
( I'll probably be doing a post on online boutiques. If you support that, do leave a comment :p )

~.~.~.~.~.~.~.~.~.~.~.~~.~.~.~.~.~

Soooooooo, since 2014 is drawing in, I've decided to do a short video on 
14 ways to style your skater skirts!


Hope you enjoyed the video and do share your ideas too! 


Much loves, xoxo.

Monday, November 4, 2013

Manicure: Cheap yet Fast?


Having a function at night after work and there's no time to get a manicure?
Check this out, nail art stickers that can be put on in 5 minutes and you're ready to go!


Found this while wandering around GM Klang with my babe. Some of the designs caught my attention 
and in my mind was.. "If it's easy to apply on, why not? Maybe can use for CNY, one day one design to suit my OOTDs". And it only cost RM5 anyhow. 

So, I bought one home after half an hour ransacking through the gazillion pieces to find one which I fancy.
Finally decided on this because
1. It's versatile
2. You can never go wrong with black and white
3. I can hypnotize people with the pattern :p


The back of the packaging with instructions (:


As you can see, there's 12 pieces altogether, 6 for each hand.


Step 1: I first cut out one piece so it'll be easier for me to apply on.
(Can skip this step as it turned out to be unnecessary)

Step 2: Remove the upper transparent layer.

Step 3: Remove the nail art sticker. (It feels like normal sticker)

Step 4: Stick the nail art sticker onto your nail.
(It'll definitely be bigger than your nail unless you have very big fingernails)

Step 5: Instead of filing the sides, I used a scissors to slowly trim.


And my end product?

.

.

.

.

.

.

.

.

.

.

.

.

.

.

.

.

.


I've painted my fore and ring fingers black instead of sticking the sticker on all nails.
Super happy with the overall design 


*TIP: Do not do this before your shower as the sides might "pop up" and it'll ruin the whole thing.
They're just stickers after all.


~.~.~.~.~.~.~.~.~.~.~.~.~.~~.~.~


Hope this serves as an useful tip for all you busy bees out there
(:


Was thinking of doing a giveaway for this, what are your thoughts? Do leave a comment ^^


Much loves, xoxo.

Saturday, October 26, 2013

Glam Them Up ❤

Being a shopaholic, I can't resist bargains. It's not an excuse, more like it's in my genes! :D 
(an excuse to cover up excuses)


These are in my October's hauls. Will post that up soon, was waiting till end of the month (:

So... They do looked a tad plain right? Don't get me wrong, I do love plain stuffs too, just that at times, 
I love to be my own glam guru and DIY my stuffs.

The product chosen for this post, one of the sandals!

What do you need?
1. Super strong glue and tweezers
You can get the glue from hardware stores. Just tell them you want the liquid type of "elephant glue". 
It only cost me RM2.


2. Any jewelries or accessories as your glam tools.
For me, I have my secret stash (:


3. Your pair of sandals or shoes, of course.
I've chosen the pink one.

Step 1: Play around with the beads, select your colors and shapes.
Step 2: Try them on the shoes and choose the ones which suit best.
Step 3: Place them in various ways and patterns till you are satisfied.
OR
You can start sticking them on randomly and go with the flow of your creativity

Randomly placing the beads

Step 4: Use the tweezers to grab the beads to stick them on.
(This is to avoid the beads from sticking to your fingers if the glue overflowed)


Follow all of the steps above and waaahlaaa!~ 
You have your own version of glammed up sandals, one of a kind created by yours truly (:


"It’s a new era in fashion - there are no rules. It’s all about the individual and personal style, wearing high-end, low-end, classic labels, and up-and-coming designers all together."
— Alexander McQueen


~.~.~.~.~.~.~.~.~.~.~.~.~.~.~.~.~.~.~.~.~.~.~.~.~.~.~.~.~.~.~.~.~.~.~.~.~.~.~.~.~
This is how it looks like on me ❤ What do you think?
Found this in my garden


I'll be sharing other DIY ideas from time to time, stay tune.
To end this post, let's get glam ❤


Much loves, xoxo.


Hong Kong (Part 2): Dim Sum and Ocean Park

Oh boy, there goes my procrastination and half a year has passed since I made up my mind to comeback to the world of blogging. Many things ...